
The Barnes and Noble Nook Color is a great device for hackers. You can root the Nook software and run Android Market and your own apps. You can also turn your Nook Color into a Honeycomb Android tablet.
One of the neat features of the Nook Color is its ability to boot from a micro SD card. This feature is what allows you to root the device and it is also what allows you to run another operating system and still retain the full Nook capabilities. The directions below are a non-destructive method for running Honeycomb on a Nook Color.
Standard Disclaimer: If you follow the directions below, you are doing something that the Nook Color developers never intended. I have made every effort to ensure this article is accurate but there is a risk you could foul up your SD card, your computer, and/or your Nook Color. While I am currently running Honeycomb on a Nook Color, that does not mean it will work for everyone. Please consider the previous statements before proceeding on in this article.
Here is what you need:
- Barnes and Noble Nook Color
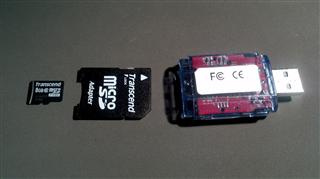
- Micro SD card (at least 4 GB) and adapter (see note2 below)
- SD card reader (either USB or built-in)
- Image Writer for Windows
- Nook Honeycomb image file from xda-developers
 Insert your Micro SD card into the adapter and then insert that into your SD card reader. Determine which drive letter your SD card reader is using. This is very important! If you choose the wrong drive letter, you will completely overwrite the contents of that drive. When you are certain you have the correct drive letter, continue below.
Extract Image Writer for Windows and the nookhoney04.img file. Start Win32DiskImager.exe. On Windows Vista/7, you will need to start this with Administrator priveleges.
Click on the small blue folder icon and locate your nookhoney04.img file. Make sure you have the correct drive letter for your SD card reader and then click Write. It will probably take a few minutes to write the image file to the card. When it is done, click Exit and remove your Micro SD card.
Find the Micro SD card slot on your Nook. It's hidden on the back side on the corner that is "broken." There is a small flap that you need to lift to reveal the slot. The slot is spring loaded so you will need to insert your Micro SD card and press it in until you hear a click. If you have large hands, it may be difficult to get the card inserted.


After the card is inserted, power up your Nook Color and it will boot Honeycomb! You will notice a few things missing, primarily there is no GMail or Android Market. Here's the explanation from the Nook Honeycomb image creator on forum.xda-developers.com:
Q: Why is there no Market app installed?
A: There's no legal way to distribute the google apps with a ROM.
So, there you have it. Not to worry though, in the next post I will walk you through installing the Android Market and GMail on your new Nook Honeycomb Tablet.

Note: If you decide you want to run the Nook software again, simply power the Nook down and remove the Micro SD card. Turn the Nook back on and you are running the Nook software again.
Note2: The class of your SD card will affect the performance of Honeycomb on the Nook Color. I first used a class 2 card and had noticeable lag in the UI. I am now using a class 6 card and have no performance problems. If you are considering purchasing an SD card, I would suggest doing a little research at the Nook Color forums on xda-developers.com or nookdevs.com.
Update 4/12/2011: Fixed typos and added disclaimer.
Update 4/14/2011: Added link to article on installing Android Market.
A SDK port is NOT a fully functioning ROM. This article is a Joke
ReplyDeleteThanks for visiting my blog. If you have a better suggestion for running Android on a Nook, I would love to hear it! Feel free to drop me a note.
ReplyDeleteMarshal
CM7 Kills this Weak Port
ReplyDeleteNico, thanks for posting back! I agree CyanogenMod is a better Android port. However, I wanted a way to preserve the stock Nook software and Deeper Blue's Honeycomb image allows me to run completely from an SD card. Perhaps I need to look at running CyanogenMod from an SD card again. Past attempts at running from an SD card did not yield good results.
ReplyDelete